Welcome to MakerHome


We've completed our yearlong print-a-day project!
All new material is now at Hacktastic: www.mathgrrl.com


Thursday, June 26, 2014

Day 304 - Hello again: Octopus tinkering

Yesterday we printed the Cute Octopus Says Hello model from Thingiverse as a first job for the MakerBot Replicator Mini. For that first print, we did everything the easy way; but you can't get easy, fast, and cheap all at the same time. According to the Preview estimate it took 40 minutes to print our 50% scale octopus, and just over 7 grams of filament. Today we'll try to optimize that print to save time and money. Yesterday's print is on the left, and today's is on the right. Can you guess what we are going to do?


Thingiverse link: http://www.thingiverse.com/thing:27053

Using MakerBot-brand filament on the Mini-sized spools is a good way to start when you first get your machine, but it's expensive. A half-pound "Small" spool of regular filament costs 18 dollars, while a two-pound "Large" spool of the same filament is just 48 dollars (compare this with 4x18 = $72 if you bought those two pounds with four half-pound spools). Using the fact that half a pound is 227 grams, we can compute the cost of yesterday's octopus:

1 cute octopus = 7.18 grams x ($18 / 227grams) = 57 cents.

If we wanted to, we could use a Small spool of filament to print just over 31 octopuses (227 divided by 7.18). If we were using a Large spool of filament then this octopus would instead only cost 38 cents, but a Large spool doesn't fit in the back of the Mini. More on this another day. For now, it's not so bad to pay half a buck to get a cool octopus. I mean seriously we just 3D-printed an octopus!

Still, let's see how we can improve this by increasing the layer height, which is the amount by which the build platform moves down for each layer of the print, and the height of the tiny layers of plastic that you will see on the finished model. Increasing the layer height will decrease the print time of a model, because the printer will have to print fewer layers. The Mini is optimized for .2mm layer height, and for models with fine detail, hinges, or specific clearances you should stick with this default. Otherwise, I print almost everything in .3mm layer height because it is not only faster, but usually also stronger. Welcome to Level 2: Tinkering.

Step 1. Load, place, and size the model.
Load up the octopus, rotate and scale to 50% like we did yesterday.

Step 2. Advanced!
Click on the Advanced Options button and then immediately find the button for "Use Defaults" and press it. Why? Because some joker probably messed with these Advanced Options, and whatever settings were used for the last print are going to still be around. Yes, you are that joker. I know you haven't messed with the options yet, but you're about to. Future-you would be wise to press this button every time, if past-you ever messes with these settings.

Step 3. Increase Layer Height to save time.
At the bottom of the "Advanced Options", increase the Layer Height to 0.30 mm.


This one step of increasing the Layer Height to .3mm will cut print time of the octopus from 40 minutes down to 29 minutes!

However, the .3mm print uses about the same amount of plastic as the .2mm print - in fact, it uses a little bit more, up to 7.77 grams from our original 7.18 grams, according to the Preview. To cut down the materials cost we can decrease the amount of infill. The default infill percentage is 10%, and it's the hexagonal infill that causes the stripes that you see in the leftmost model in the photo at the top of this post. It turns out that for the cute octopus model we can actually remove all of the infill material, because there are no drastic overhangs in the design. Most models are not simple enough to survive 0% infill, but for this particular model it is okay. The printer will be able to print this particular model as a hollow shell. More on overhangs later. For now let's just print a hollow octopus.

Step 4. Decrease Infill to save money.
From the same menu, decrease the Infill to 0%.


This cuts our filament cost down to 5.51 grams per cute octopus! That might not seem like much of a difference for this model, but the Mini can actually print some fairly large models. If this were a full-size octopus then the infill reduction could make a sizable difference.


Here is a table of the time and filament costs for the 50% scale cute octopus (based on the data from the Print window, not from real-life measurements), with different infill and layer height values.


The undersides of the three octopuses from yesterday's picture are shown below. Today's print was the one in the middle; it's hollow but it does have a base. Tomorrow we'll level-up to Pro and get that base layer off!

Wednesday, June 25, 2014

Day 303 - Hello Octopus: A simple first print for the Mini

This is the second in a series of posts about getting started with 3D printing, and the printer we'll be using along this journey is the MakerBot Replicator Mini. If you have a different sort of printer I hope you can still get something out of these posts, although admittedly they are going to include a lot of Mini-specific walk-thoughs and technical hardware and software discussions, at least at first.

The first thing I recommend printing on the Mini is Cute Octopus Says Hello, one of MakerBot's own designs on Thingiverse and the model they use for illustrating their filament colors. This is one of the simplest designs you could choose: it has no overhangs, nothing complicated, and it scales well. In fact we're going to print a mini-version at 50% scale.


Thingiverse link: http://www.thingiverse.com/thing:27053

Our octopus-printing is going to be split over three days. Today is Level 1: Straight up easy. We'll print the octopus shown on the left in the picture above, with no special modifications or settings. Tomorrow and the next day we will level-up to changing some settings that speed up the print and use less filament.

Step 1: Load the model. 
From the MakerBot Desktop software, click "Explore" and then search Thingiverse for "cute octopus says hello". The model we'll be using should be first in the list, and dated June 31, 2012. Click on the model and then click the red "Prepare" button to see the file. Then click the new "Prepare" button near that file to load it into the software.

Step 2: Rotate the model.
This isn't necessary but it seems kind of unfriendly for the octopus to face away from us, so we'll turn it around. Click on the octopus and then click on the "Turn" button. The bottom of the three options will rotate the model around the vertical z-axis. Click the third "+90" button two times to turn the octopus around.


Step 3: Scale the model.
Since we're on a Mini we'll start by printing "mini" at 50% scale. Of course this will also make the print a lot faster; this is a linear decrease to 50% scale, so the volume will decrease by much more (we'll talk more about this later). Click on the "Scale" button, type in 50.00% percent in the "Scale To" box, and press Return/Enter.


Step 4: There is no step 4. 
This is the easy day, remember? Let's color inside the lines for this first print, and not change anything under the "Settings" tab.


Step 5: Press Print!
Okay now you can press the red "Print" button. This will bring up a window that shows how much time and filament the print will cost you. Before printing click "Print Preview" so you can check out what the Mini will be doing as it prints.


Step 6: Print Preview.
For a simple print like this one, we don't actually need to look at the Preview; it's just interesting. Move the vertical slider on the left of the window to see what the printer will do at various levels. This is perhaps clearest if you first click "View from Top" and then move the slider. At each level of the print the nozzle will follow the path shown at that level. The screenshot below shows a level around halfway up; you can see the eye indentations at this level. You can also see the vaguely hexagonal filler material in the center of the model. The slicing software uses this filler for any interior solid parts of your model, to save filament and time. The default settings are for the interior fill to take up 10% of the space, with the other 90% as empty space. We'll mess with the default settings later, but not today.


When you're done looking at the Preview just click "Close" and then select "Start Print" to start your print. Or you could just stare at the printer for five minutes wondering why nothing is happening and then realize that even though you hit "Print" earlier you still have to hit "Start Print" now. That's how I did it and things turned out okay in the end.

Step 7. Wait and watch and other stuff and then remove your print.
After about 40 minutes (give or take 5-10 minutes and plus a five-minute warm-up), your print should be ready. Remove the build platform from the machine and then remove the model from the platform. 

Step 8. Remove the raft. 
There will be a "raft" at the bottom of the model that you need to pull away. You may find it useful to use some sort of pliers or tool. Two pieces of advice: First, try to tear off the raft instead of cutting it away. It works best if you can manage to get it off all in one piece, just like when you try to remove a price label from the bottom of a plate or a glass; otherwise you'll have to spend time removing the little bits that got left behind. Second, be reasonably careful. It is possible to get poked by the PLA and in fact that happened to me today because I figured hey I'll just yank this off carelessly, what could happen I've printed like three of these octopuses already so this PLA can't hurt me I am invincible. Then I had to pull a PLA splinter out of my thumb. Here's a picture of what the raft looks like, alongside the finished model:


Next time: Advanced settings!

Tuesday, June 24, 2014

Day 302 - Setting up the Mini

Today my 9-year-old assistant Calvin will be setting up a Replicator Mini. This is the start of a series of posts on how to get started with a 3D printer, what you might try printing first, how to modify existing designs and make your own, what supplies you might want to have on hand, and things you can do in the classroom or with your own kids.


The Mini was built to be easy, and as far as setup is concerned it definitely is, as Calvin will now demonstrate. The extruder snaps into place with a strong magnet:


Then you put the filament spool in the back, pull the filament through the tube, and seat the tube clip near the spool. Make sure your spool has the filament feeding from below into the clip:


Then insert the end of the filament into the top of the extruder:


Finally, snap in the build plate:


Once the printer is set up you have to install the MakerBot Desktop software. For those of you with pre-5th-gen machines, Desktop is different from MakerWare, and it's both more and less powerful at the same time: it's more powerful in the sense that it is connected to Thingiverse and a Library of your designs, but less powerful in the sense that there is a lot less flexibility with custom profiles and settings. The same is true of the machine itself: it's more powerful, has a better extruder, etc, but it's not made to be taken apart and repaired like the trusty Replicator 2 was.

Once you get Desktop installed, it is a good idea to immediately update your firmware. From the menu at the very top of the MakerBot Desktop screen choose Devices/Update Firmware, then download the firmware. The process takes a while and then the printer will restart. If you have a problem with your prints, the very first thing that Support is going to ask is whether or not you have updated your software and firmware, so you might as well do it now!

Here are some links to help you finish setting up and get started on your first print:
To get started right away you can try one of the example files that come with the Mini: From the menu at the very top of your screen while in the Desktop software, look under File/Examples for various things that you can print.  In tomorrow's post we'll have another recommended "first print" you can try. 

First impressions so far: The Mini is built to help you learn fast, but it forces you to color inside the lines. This is great for getting started, but when you want to tinker outside of the lines it can be a challenge. Nothing we can't fix, though! Over the next few weeks we'll explore both how to print things quick-and-easy and how to break the rules and go further to tinker and modify prints on the Mini.

Monday, June 23, 2014

Days 301+ to be posted in BROOKLYN!

This blog is officially on hiatus until after we finish moving to Brooklyn. Stay tuned for the end of next week when we'll post the exciting news from this week about our new printer and how it works!

See you on the other side, good old MakerBot Replicator 2...

Sunday, June 22, 2014

Day 300 - Divisibility by 100 celebration with 400 Menger sponges!

We are at Day 300 in our year-long print-a-day project, thank goodness. In celebration, today's print is a HUGE LEVEL 4 MENGER SPONGE, built out of 400 tiny Level 2 Menger sponges printed with a bunch of Replicator 2 and Afinia H-Series machines at home and at work over the last few weeks.


This model is now disassembled and the 400 tiny cubes will be given away to those who attend my Math Encounters talk at MoMath in NYC next week. The talk is free but you have to register in advance at one of the links below:

Making Mathematics Real: Knot Theory, Experimental Mathematics, and 3D Printing


Here is a close-up picture of the Level 4 assembly:


Settings: These cubes were printed using owens' clever external-support-stand method, with no support needed. We used Replicator 2 machines with raft but no supports, and Afinia H-Series machines with as little support as the software allows on a Mac. 

Technical notes, assembly flavor: Because of the overhangs in the Level 4 Menger sponge, we had to use a few pieces of paper in the assembly so that things would stay in place without using glue. You can see the papers we used in the time-lapse sequence below. (Shout-out to dayofthenewdan's great Time Lapse Assembler software, which made it very easy to piece our sequence of pictures into a short video.)


Here is another time-lapse sequence, this time from the side:

Saturday, June 21, 2014

Day 299 - Tricolored representation of 7_7

Today we are finally at the end of the 15-knot series of knot conformations that we started on Day 266. This one is a tour-de-force, made by printing out separate pieces and heat-gluing them together afterwards! It is a tri-coloration of the the last seven-crossing knot, 7_7


Settings: MakerBot Replicator 2 + heat gun!

Technical notes, math flavor: Knot colorings are one of the simplest examples of invariants, and a good place to start if you are interested in knot theory. A proper 3-coloring of a knot projection is a coloring of the strands of the knot with three colors so that at each crossing, either all three strands coming into the crossing are the same or all three strands coming into the crossing are different. If you're interested in learning more, here are two papers I wrote with students about knot colorability:

Technical notes, design flavor: This knot was made by JMU student Jonathan Gerhard using TopMod. Here is what he has to say about his design process for this knot model:

This knot started with the typical model for 7_7, exported from KnotPlot and then imported into TopMod. Note that in TopMod, holding down option and then clicking will allow you to rotate the view. Start by going to Selection/Select Edge Ring so that your selection tool will select rings around the model with each click. 


Then click on the mesh where you want to separate the pieces. For example, to isolate the strand I labeled "4" in the files, I made the selections pictured below and then went to Edit/Delete Selected


After deleting the sections it looks like this:


Now highlight the rest of the knot by pressing Shift while highlighting the edges of the mesh. For example, here's a fully highlighted knot that I got while trying to isolate strand "6":


Again, choosing Edit/Delete Selected allowed me to isolate the strand, after which I could Export it from the file menu as an STL. 

Finally, click the yellow back/undo arrow to get back to the entire knot, choose a ring of mesh one edge over so that the next strand includes the bit you originally cut away, and cut away the strand you already made. Here's the whole knot after segment "4" is exported and cut out: 


Repeating thie process with each strand allows you to isolate each piece and print them off in their respective colors. Then you can glue them together after printing. 

Here is a picture of the five JMU students in the 3-SPACE Math 297 class that constructed the knots in this series. From left to right are Patrick, Jonathan, Kirill, Greg, and Taylor. This picture was taken right after their double presentation and 3D-printing demo at the MD/DC/VA MAA meeting this spring. (And yes, two of them showed up to the presentation wearing Ecogeeco's 3D Bow Tie from Thingiverse!)

Friday, June 20, 2014

Day 298 - Friday Fail: Down but not out - also come see me July 2 in NYC!

Still trying to pack up 14 years of house and move it to a Brooklyn apartment, and that is taking pretty much all my time these days. Since I seem to be a failure expert I will try to practice the number one rule about failure: that it is a temporary condition. I will get back to the blog soon, and fill in the missing posts before this one.

In the meantime, if you live in the NYC area, you might be interested in my Math Encounters talk about mathematical 3D printing at MoMath, the Museum of Mathematics, on July 2. That's just one day after we move so I'll probably be very well-rested and give an excellent talk, right?

If you come to the talk please introduce yourself to me afterwards; I'd love to meet people from the area who are interested in 3D printing. Here are the links to register for the event; it's free but you have to register before it fills up:

“Making Mathematics Real: Knot Theory, Experimental Mathematics, and 3D Printing” July 2 at 4:00 PM

“Making Mathematics Real: Knot Theory, Experimental Mathematics, and 3D Printing” July 2 at 6:30 PM


Notice the giant 10_125 knot from Day 11 featured on the poster! And that Jennifer Lawton, President of MakerBot, will also be speaking!

Also yes, I did print something today: A tiny version of vertox's beautifully curved Shy-light. I don't intend to put a light in this one; I just wanted to be able to see and feel the shape so I could understand it a little better. Here is the view from underneath:


Thingiverse link: http://www.thingiverse.com/make:82143

Settings: Printed on a MakerBot Replicator 2 with translucent filament at 30% scale, on .3mm/low with a raft, on blue painter's tape on a glass build plate, in just 14 minutes.

Thursday, June 19, 2014

Day 297 - Borromean rings for the fourth dimension

Today we reprinted a giant red model of the Borromean rings from our Borromean Rings Collection on Thingiverse that we made on Day 178, to replace the giant blue model pictured there. The blue model is now on a trip to the UK to Matt Parker (standupmaths on Twitter), who will be photographing it for a chapter in his upcoming book Things to Make and Do in the Fourth Dimension. We will miss you, blue rings. Long live red rings!


Settings: This model prints as one piece with almost no support at all. Here it is just after printing on our REPLICATOR 2 WE STILL LOVE YOU PLEASE DO NOT BE DISCONTINUED.

Wednesday, June 18, 2014

Day 296 - Spiral conformation of 7_6

The penultimate knot in our series is the knot 7_6, in both standard conformation and the spiral S(5,2,(1,1,-1,1)) conformation from Day 234.


Thingiverse link: http://www.thingiverse.com/make:82547

Settings: Makerbot Replicator 2 on .3mm/low with custom knot slicing settings. The knot requires almost no support material if you print it end-up instead of flat on its side.

Technical notes, spiral flavor: It isn't known whether or not all knots have a spiral representation. As of the time of this blog post we know that eight of the fifteen knots through seven crossings are spiral. The spiral notation S(n,k,(....)) denotes that the knot can be represented as an n-strand braid periodic knot with k repetitions and over/under spiral pattern determined by the vector in parentheses.
  • 3_1 is a torus knot so has two spiral representations: S(2,3,(1)) and S(3,2,(1,1))
  • 4_1 has spiral representation S(3,2,(1,1))
  • 5_1 is a torus knot so has two spiral representations: S(2,5,(1)) and S(5,2,(1,1,1,1))
  • 6_2 has spiral representation S(5,2,(1,1,1,-1))
  • 6_3 has spiral representation S(5,2,(1,1,-1,-1))
  • 7_1 is a torus knot so has two spiral representations: S(2,7,(1)) and S(7,2,(1,1,1,1,1,1))
  • 7_6 has spiral representation S(5,2,(1,1,-1,1))
  • 7_7 has spiral representation S(5,2,(1,-1,-1,1))

Tuesday, June 17, 2014

Day 295 - Tangle conformation of 7_5

Just three knots left in the conformation series that we started on Day 266! Today we have the knot 7_5 in a tangle conformation, where you can clearly see the Conway notation [322] for this knot; note the one three-twist and two two-twists in the red model on the right:


Thingiverse link: http://www.thingiverse.com/make:82546

Settings: MakerBot Replicator 2 with our usual custom knot slicer settings.

Technical notes, KnotPlot flavor: This knot was made by JMU student Greg Houchins using KnotPlot. Here is what he has to say about his design process:

A particularly visual way to make a printable tangle-based knot  is with KnotPlot's Rational Tangle Applet that gives you one rational tangle to twist on the top, bottom, left, or right in any direction.  This provides a way to visualize the physical construction of the knot but is limited by its inability to follow Conway notation directly.  To make specific knots given their Conway notation, it is easier to use KnotPlot's Rational Tangle Calculator. This calculator includes the ability to make, transform and adjoin all the tangles need to follow the usual tangle construction algorithm. 


To make the 7_5 model (with Conway notation [322]), open the KnotPlot Tangle Calculator and click on the number 3 to create the tangle with 3 clockwise rations.  Then transform the knot with the r button and press the number 2 button to form the tangle with two clockwise rotations.  To adjoin them, press the # button. Then transform them again with the r button, make another tangle with 2 rotations, and adjoin them with #. To finalize the knot, press the N button to make the numerator knot, which is what we want.  One this knot is formed, we can export it as an .obj file by going to the KnotPlot command line and typing objout 7_5knot (where "7_5knot" is the title of the file it will create).

Monday, June 16, 2014

Day 294 - Secret push-pin shelf

One more push-pin print; this time we took another design by Tosh on Thingiverse, his Secret Shelf, and scaled it down for use on the corkboard. Our first attempt was a reduction to 60% scale, shown on the left in orange; this is the bottom of the shelf but we are using it upside-down since it was too small to have a proper lid (it would have crashed into the push-pins). The second attempt is shown on the right with a dollar hiding inside, at 80% scale.


Thingiverse link: http://www.thingiverse.com/make:82541

Settings: Printed on a Replicator 2 with .3mm/low layer resolution and at 60% and 80% scales.

Sunday, June 15, 2014

Day 293 - Push-pin push-pin-less holder

Today we printed a push-pin-less push-pin, for those times that you don't want to leave a hole in your object; the design is Tosh's beautifully simple Wall mount paper clip from Thingiverse.


Thingiverse link: http://www.thingiverse.com/make:82539

Settings: Replicator 2 on .3mm/low, printed with the object on its side so that supports are not needed. The push-pin hole came out well even in that orientation.

Technical notes, Father's Day edition: Happy Father's Day everyone! To celebrate we took Phil out to a mountain cabin for some analog relaxation time. Sort of the opposite of what we'll experience when we move to NYC next week. Here is what it looked and sounded like at dawn, with the sun just coming up over the beautiful Shenandoah Valley mountains:


Saturday, June 14, 2014

Day 292 - Push-pin push-pin holder

Today is Saturday and we are printing things for young C, who needs things for his corkboard. First, a push-pin holder that is held up by push-pins, JamieLaing's Thumbtack-able Thumbtack Holder from Thingiverse:


Thingiverse link: http://www.thingiverse.com/make:82538

Settings: The usual .3mm/low layer height with a Replicator 2. The thumbtack holes came out just the right size and the model is quite sturdy.

Friday, June 13, 2014

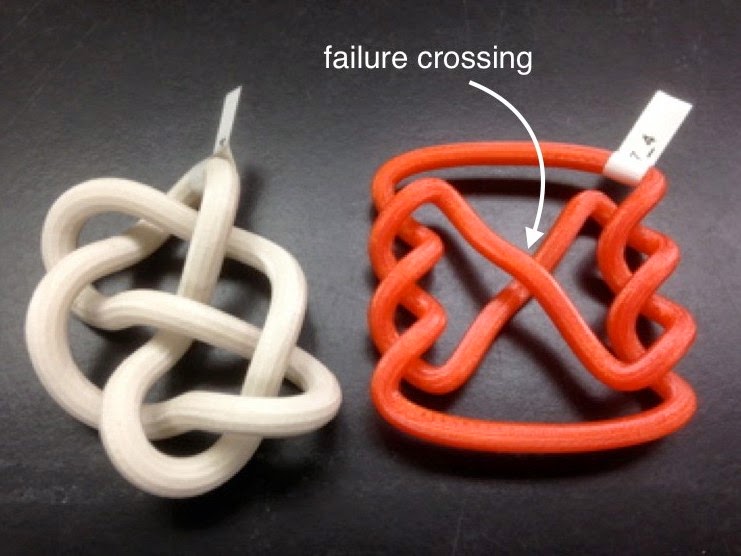
Day 291 - Friday Fail: Crossing change edition, with Pretzel conformation of 7_4

The most eagle-eyed of you may have noticed an error in one of the knots in the group photo of the knot conformations series on Day 266. We got one of the crossings wrong in 7_4!


Specifically, we accidentally made a print of P(-3,1,-3) - that is, three negative twists on the left, one positive twist in the center, and three negative twists on the right - when we needed a print of P(-3,-1,-3). Since we reversed the crossing in the middle we made a knot that can be moved into a projection with fewer than seven crossings. If the knot were made of rubber, we could grab the overstrand of the center crossing and stretch it out around the outside of the knot, eliminating three crossings. This means that the knot we printed has a crossing number of at most four, so must either be 4_1, 3_1, or the unknot. Bonus question: Can you tell which?

Here is the fixed version, although to confuse you we decided to swap all of the *other* crossings instead of changing the center one. In other words, we printed the pretzel knot P(3,1,3), which is still a conformation of the knot 7_4.


Thingiverse link: http://www.thingiverse.com/make:82536

Settings: MakerWare .3mm/low on a Replicator 2 with custom knot slicing profile.

Technical notes, math flavor: This knot was made by JMU students Greg Houchins and Kirill Korsak, who used Mathematica's KnotData package to export an STL file of this pretzel conformation. How did they know this pretzel knot is 7_4? Because they computed its knot determinant and the answer was 15. Since the pretzel knot above is in a projection with 7 crossings, we know that its crossing number is at most 7, and therefore that it is one of the first fifteen knots in the Rolfsen table. Only one of those knots has determinant 15, and that is 7_4. Below is a handy table of determinants for the knots through 7 crossings, generated by the amazing KnotInfo site.

Thursday, June 12, 2014

Day 290 - Cantarella conformation of 7_3

Today's knot conformation takes us back to the beginning of my 3D-printing journey in February 2013, when I got my first 3D printer - still my favorite - a MakerBot Replicator 2. (Sad note: I think this fantastic printer has been discontinued, as it is consistently out of stock on the MakerBot site. Too bad, because this is the best 3D printer I have ever had the pleasure of using. I have one at home, one in the JMU MakerLab, two in the JMU 3-SPACE Classroom, and I wanted to get some of them for MoMath when I start there this fall.)

Back in early 2013 my entire motivation for getting a 3D printer was to print knots, since that is what I usually study when I am wearing my math professor hat. Specifically, I wanted to print knots in a minimum conformation, that is, knots that were as tight as possible. Of course it is difficult to see what tight knots are doing since they are all bunched up, so many of my early prints of tight knots were "blown out" - really meaning that the strands were made thinner - so that there would be space between the strands; for example see Day 9 and Day 11. Today's conformation of 7_3 is a true "tight" conformation, pulled together as closely as possible. The data for this knot was kindly provided by Jason Cantarella from the Department of Mathematics at the University of Georgia, also known as DesignByNumbers on Thingiverse, where he has provided files for a very large number of minimum-conformation knots and links.


Thingiverse link: http://www.thingiverse.com/make:82272

Settings: Printed on a MAKERBOT REPLICATOR 2 I LOVE YOU PLEASE DO NOT BE DISCONTINUED.

Wednesday, June 11, 2014

Day 289 - Braid representation of 7_2

Continuing with the knot conformations series we started on Day 266, today we printed a braid representation of the knot 7_2.


Thingiverse link: http://www.thingiverse.com/make:82269

Settings: Printed on a Replicator 2 with our custom knot support profile.

Technical notes, Mathematica/Blender/Tinkercad flavor: This knot was printed by JMU student Patrick Moran, using Mathematica to get the original braid shape, Blender to thicken the strands, and Tinkercad to add bars at the top and bottom of the model. Here is what he has to say about his process:

For the knot 7_6 I decided to show a simple braid representation, where the crossings occur between adjacent strands in a series of strands that we imagine as connecting up at the ends (that is, the first strand at the top bar is connected to the first strand on the bottom bar, and so on). Every knot has such a braid representation; see Colin Adams' Knot Book for a nice proof of this. To get a 3D model of the braid representation I used Mathematica, with commands as shown in this screenshot:


After exporting we used the Blender-thickening method from Day 285 to thicken the strands, and added bars to the top and bottom using Tinkercad.


Tuesday, June 10, 2014

Day 288 - Micron Bach

One of the things I had to give up to move from a house in the country to an apartment in Brooklyn was my drum set. Apparently you have neighbors and stuff when you live in an apartment building, and not all of them appreciate loud banging noises. In the hopes that I'll find time to turn my musical attentions to learning how to use our Alesis Micron synthesizer, today I printed a little Bach bust to sit on the Micron, from ad1124's very nice bach_final Digitizer-scanned model on Thingiverse:


Thingiverse link: http://www.thingiverse.com/make:82268

Settings: Printed on a MakerBot Replicator 2 with MakerWare .2mm/standard; that's better resolution than I usually use, but I wanted to make sure to capture the details of the model.

Monday, June 9, 2014

Day 287 - Grocery bag holders

In preparation for walking groceries home from the shop in the big city, today we printed three of ivanseidel's Bag Holder model on Thingiverse (one for each of us in the family). There are a number of bag holders on Thingiverse but the design of this one is particularly sturdy and elegant, with large comfortable handles. I think they look like elephants somehow. Try making one and having people guess what it is. So far none of the people I have asked have been able to figure it out on their own, although they come up with a lot of strange and interesting guesses!


Thingiverse link: http://www.thingiverse.com/make:82266

Settings: MakerWare .3mm/low with no raft and no supports. The print is quick and light despite looking rather large.

Sunday, June 8, 2014

Day 286 - Torus conformations of 7_1

Today we have two torus knot conformations of 7_1. A torus knot is one that can be drawn on the surface of torus ("inner tube" shape) without intersecting itself. A T(p,q) torus knot wraps around the torus like a clock p times, and around the handle of the torus q times. The standard conformation of 7_1 in the knot table is shown on the left, in the form of a T(2,7) torus knot. The blue conformation on the right is the same knot but in the T(7,2) torus knot conformation.


Thingiverse link: http://www.thingiverse.com/make:82264

Settings: Printed on a MakerBot Replicator 2 with our custom knot slicing settings to minimize supports. Printing the knot on its side results in far, far less support material than printing knot horizontally.

Technical notes, OpenSCAD flavor: This knot was printed by JMU student Taylor Meador, who used a modified version of the OpenSCAD code for our trefoil torus knot models from Day 150 (thanks as always to kitwallace).

$fn=24;

/*
// trefoil as the torus knot T(7,2)
// http://mathworld.wolfram.com/Torus.html
// take parameterization of torus (u,v)->R^3
// and let u=2t, v=3t
// scaled to 40mm before tubifying
function f(t) =
[ 3.9*(3+1.6*cos(7*t))*cos(2*t),
3.9*(3+1.6*cos(7*t))*sin(2*t),
3.9*(1.6*sin(7*t))
];
// create the knot with given radius and step
tubify(1.6, 1, 360);
*/

module tubify(r, step, end) {
for (t=[0: step: end+step]) {
hull() {
translate(f(t)) sphere(r);
translate(f(t+step)) sphere(r);
}
};

Saturday, June 7, 2014

Day 285 - Seifert surface of 6_3

Today we continue with the knot conformations collection that we started on Day 266. (See also Day 267, Day 268, Day 269, Day 272, Day 273, Day 275, and Day 276.) Today's knot is 6_3. Along with the usual conformation of 6_3 we printed a confirmation with a Seifert surface. A Seifert surface is a surface whose boundary is the knot, so if you trace along the edge of the red model you will trace out a conformation of the knot 6_3.


Thingiverse link: http://www.thingiverse.com/make:82226

Settings: Printed on a Replicator 2 with the model on its side, to minimize supports.

Technical notes, math flavor: This knot was made by Jonathan Gerhard, who has this to say about the math behind his model: A Seifert surface of a knot is an orientable, simply connected surface with a knot as its boundary. There are infinitely many different Seifert surfaces for any given knot. This particular example is a “Ribbon” configuration of a surface with the 6_3 knot as its boundary. An algorithm to create such a surface from any knot was first given by Herbert Seifert in 1934, and since then many different knot invariants, things that don’t change no matter how the knot is represented, have been found in relation to these surfaces.

Technical notes, SeifertView/Blender flavor: To make the Seifert surface model, Jonathan used the wonderful program SeifertView, created by Jack van Wijk from the Department of Mathematics and Computer Science of Eindhoven University of Technology. The freely-available version of SeifertView does not include an STL exporter, but Dr. van Wijk was kind enough to send Jonathan a special copy of the program that would allow STL export for this project. After exporting from SeifertView, Jonathan did some post-processing in Blender to thicken the surface. Here is his walkthrough of what he did to make today's model:

To begin with, you need to download a special version of SeifertView that allows exporting. It’s not currently online, so if you need it, contact me at gerha2jm@dukes.jmu.edu. On the right-hand side of the SeifertView window there is a menu in which you can click on 6_3. Then on the bottom there will be an option to change it into a Ribbon surface and an option to Smooth the surface. Unclick the Smooth button after you’re satisfied with the smoothness.


Now you'll want to go to Misc. in the upper right-hand corner, choose Advanced, and choose Save Geometry under option two.


Now go in Blender, go to File/Import/OBJ. On the right-hand side there will be a small row of icons including a camera, sphere, etc. Choose the wrench, click Add Modifier, and then choose Solidify.


Change Thickness to 0.03, and Offset to 0. Make sure High Quality Normals and Fill Rim are checked. (Note for future prints: Our model had some problems with its boundary when printing; it may help to flip the normals at this point and see if that helps solve the problem.)


Finally, hit Apply, then go to File/Export/STL.